Saturday, August 28, 2010
Project 11-3: Using TrueCrypt
What is TrueCrypt?TrueCrypt is an alternative to EFS, a third party application which is also used to protect files with cryptography.
How to use TrueCrypt?
- Download TrueCrypt Installation file by clicking here
- click "Download" under "Windows 7/Vista/XP/2000" and save the file.
- Install the installation file and Launch TrueCrypt once complete.
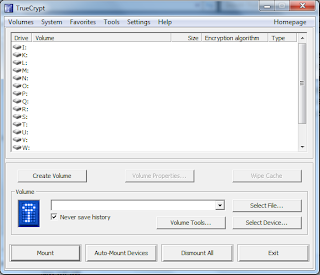
- click "Create Volume Button".
- Select "Create a file container" and click "Next"
- Select "Standard TrueCrypt volume" and click "Next"
- Click on "Select File..." and type in "TrueCrypt Encrypted Volume" under file name
- Click "Save" and click "Next"
- Make sure "AES" is selected in "Encryption Algorithm" and click "Next"
- Key in "1" and make sure "MB" is selected, click "Next"
- Key in a Strong Password and click " Next"
- Move your mouse in the box for about 30 seconds as randomly as possible
- Click "Format"
- Click "Ok" and followed by "Exit"
- In "Volume", Click "Select File ..." and select "TrueCrypt Encrypted Volume" which you created.
- Click on a drive letter above and click on "Mount" at the bottom left.
- Key in the password
- Once done, it would be mounted on the computer like a normal flash drive.
- open "Encrypted.docx" in the previous project and save it in the mounted drive.
- open the saved file and it should take a longer time to load as two decryptions are taking place. (EFS & TrueCrypt)

If given a choice between EFS & TrueCrypt, I would select TrueCrypt as it provides me with more features and most importantly it is portable. By using just a single strong password, I am able to create a file which is highly encrypted and when i want to gain access, I would only need to provide the password. It is also able to encrypt a flashdrive and its contents are automatically encrypted when a file is stored in it and secured with a strong password.
On the other hand, EFS encrypts only on the system itself and saves a identity of the user. And only with this identity tag, I am able to gain access to the files. I may accidentally lose this identity tag if it was stored in a flash drive.
Therefore I would choose TrueCrypt over EFS.
Posted by LoNeLyXx at 1:14 AM
Project 11-2: Using Microsoft's Encrypting File System (EFS)
What is Microsoft's Encrypting File System(EFS)?Microsoft's Encrypting File System(EFS) is a cryptography system for Windows operating systems that use the Windows NTFS file system. Because EFS is tightly integrated with the file system, file encryption and decryption are transparent to the user.
Using Microsoft's Encrypting File System (EFS)
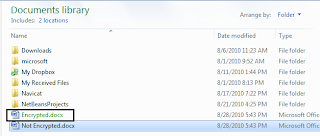
- Create two documents in Microsoft Words with the same contents and save it as "Encrypted.docx" & "Not Encrypted.docx".
- Navigate to the directory of the saved files.
- Right click on "Encrypted.docx" and select properties
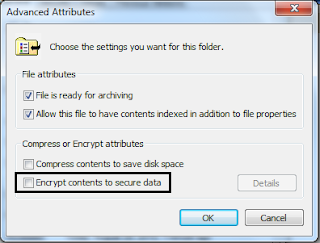
- In the "General" tab, under "Attributes" click "Advanced..."
- Tick "Encrypt contents to secure data" and click Ok twice
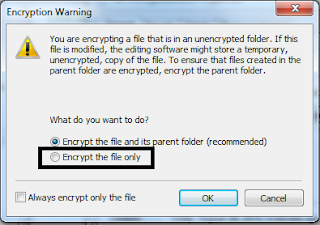
- A prompt may appear asking you whether you would like to encrypt the parent folder as well. Select "Encrypt the file only" and press "Ok".
- Now the encrypted file should be green in colour and this shows that it is encrypted.


To me, EFS is quite useful as it is tightly integrated with the file system which makes the encryption and decryption process nearly invisible to the end user.
It allows us secure sensitive data or even folders to from unwanted viewers while on a shared system. An attacker could use a LiveCD to boot up another OS to gain access to the files but with EFS, the identity tag was not provided and thus the attacker will not be able to gain access to the sensitive data. It uses an identity tag which can be stored in a portable storage device which is useful if your os is corrupted and you would want to retrieve files are the hard disk.
Posted by LoNeLyXx at 1:13 AM
Project 11-1: Installing Hash Generators and Comparing Hashes.
Installing Hash Generators and Comparing Hashes.- go to the link provided and save the file. "http://sourceforge.net/projects/md5deep/files/md5deep/md5deep-3.6/md5deep-3.6.zip/download"
- extract the contents in the file
- The programs are executed in Command Prompt and thus saving it on the root(c:\) or a flash drive to more efficient for this project.
- Create a Microsoft word document with the contents, "Now is the time for all good men to come to the aid of their country.".
- Save the document as "Country1.docx" in the same directory with the extracted contents.
- Start up the command prompt.
- navigate to the directory of the files.
- Key in "MD5DEEP COUNTRY1.DOCX" followed by "MD5DEEP MD5DEEP.TXT"
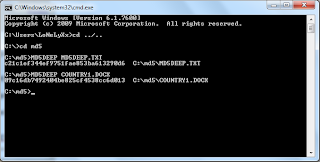
- Comparing both hashes, both have the same length, which makes the strength of md5 strong because no matter how big your file is, the generated hash has the similar length and thus harder to crack.
- Now open up "Country1.docx" remove the full-stop at the end of the document and save it as "Country2.docx" in the same directory.
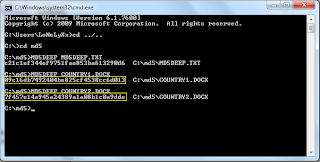
- Comparing the two hashes, by just removing one full-stop, the two hashes have totally changed.
- Now perform the same operation for "Country1.docx" & "Country2.docx" by using


- SHA1DEEP
- SHA256DEEP
- WHIRLPOOL
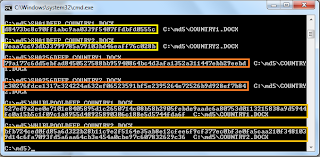

Comparing Hashes
By comparing the difference between the following hashes:
- MD5DEEP
- SHA1DEEP
- SHA256DEEP
- WHIRLPOOL
WHIRLPOOL has the longest hash as it creates a hash using 512 bits and has received international recognition and adoption by standards organizations
Posted by LoNeLyXx at 12:34 AM
Project 8-5: Use an OpenID Account
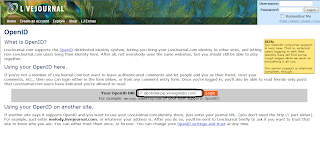
Use an OpenID Account- first go to "http://www.livejournal.com/openid/"
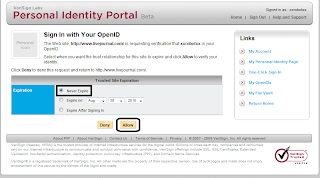
- Key in your identity URL in "Your OpenID URL:" as shown in the diagram below.
- It would redirect to the OpenID Login Page
- Sign In and tick "Never Expire" click "Allow".
- It will return to LiveJournal Website.
- Logout of LiveJournal.
- Go to "www.lifewiki.net/login".
- Enter "Your PIP Url" in "Identity URL" and click "Login via OpenID"
- Note that when you click Login, it did not request for your OpenID password anymore as you are still logged on in OpenID.
- Click Allow.
- Once done logout.


- Remove the hassle of keying in your information everytime you sign up on a website
- Remove the stress of remembering passwords for each and every account.
- Minimizes the risk of account being hacked.
I think OpenID is very useful as it removes the hassle of keying in your information everytime you sign up on a website and because passwords are not sent to the servers and only information is sent, risks of the account being hacked is minimized.
The best thing about OpenID is removing the need of remembering passwords for many forums, websites & etc. OpenID provides the information to the servers and a account is created using just the OpenID URL.
Posted by LoNeLyXx at 12:06 AM
Friday, August 27, 2010
Project 8-4: Create an OpenID Account
What is OpenID?OpenID is a decentralized open source FIN that does not require specific software to be installed on the desktop. OpenID is a uniform resource locator (URL)-based identity system.
Create an OpenID Account
- Go to https://pip.verisignlabs.com/ and click on "Get Started Now".
- Key in the requested information and click on "Create Account".
To add a Personal Image to your account
- Click on "My Account" under "Links"
- Click on "Browse" under "Personal Icon"
- Click on "My Account" under "Links"
- Click on "My Information" under "Links"
- In this information page, the information keyed in will be sent to any website that uses OpenID to authenticate the user.
Take Note:
There are no restriction how websites uses the information that are keyed in. Therefore, it is best not to key in more then considered neccessary.
There are no restriction how websites uses the information that are keyed in. Therefore, it is best not to key in more then considered neccessary.
Reflection on Project 8-4:
Posted by LoNeLyXx at 10:21 AM
Project 8-1: Use Cognitive Biometrics
What is Cognitive Biometrics?Cognitive Biometrics add a two-factor authentication without placing tremendous burden on the user.
Use Cognitive Biometrics
- Click here to go to the website
- In the "First Time User's" field, key in the requested information and click "CLICK TO ENROLL".
- Click on "Click to Continue".
- Click "Ok" after reading information.
- Accept "demo" as the name and click "Ok".
- Click on "Next" to enroll now.
- Start by following the on-screen instructions.
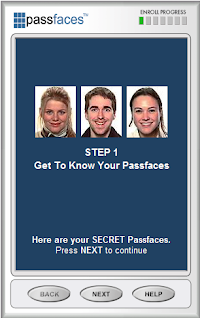
- After enrolling, go through a few rounds of logging in to make sure you have remembered the three passfaces.
- When you are done with the process click on "Done".
 You can try to logon into passfaces by going back to the first page and clicking "LOGON" in the returning users.
- Make the the username is "demo", click "Ok" and identify the faces.


In my opinion, I think that passfaces is very useful, as some people may be forgetful and forget their passwords and by using passfaces, I could recognize my friend and do not need to crack my head thinking what password I use to create the account.
It also allows me to logon fast onto my account. Passfaces also creates a more secure online environment at costs significantly less than alternative technologies. It is not expensive and easy to use.
Posted by LoNeLyXx at 10:21 AM
Project 7-2: Download and Install a Password Storage Program
In this practical, I learn that when i create accounts on websites, strong passwords may be difficult to remember and there is a program called KeePass Password Safe which stores passwords securely in the program and protected by a Single strong password- Firstly click here to download and save the file.
- After downloading the file, extract the file in a location such as desktop, a folder or a portable thumbdrive.
- Run the application file "KeePass" inside the "KeePass-1.17" folder.
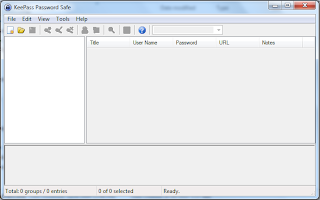
- Click on "File" and "New" to create a password database.
- Key in a strong Master password and click "Ok".
- Once completed, click "Edit" and followed by "Add Entry".
- Select a group to catogerize your entrys.
- Key in the data for an online account.
- Once done click "Ok".
- Click "File" and "Save".
- save it as your desired filename.
- Now Click on "File" followed by "Open" and select a Password Database to open.
- Key in the Master Password and click "Ok".
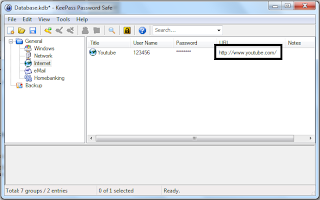
- Click the category that your Entry is stored in.
- Double click in the URL and it would direct you to the website
- Next drag the "User Name" field into the website field for username.
- do the same for password by dragging the "Password" Field.
- Click the button to login on the website.


By using Password Storage Programs, there are pros and cons. Firstly, you are able to create Strong passwords on websites and this would greatly minimize the chances of hackers cracking the password. But on the other hand, If the Password Database is stolen and the Master Password is cracked, the hacker is able to gain the passwords no matter how strong the password is.
If I was asked whether i would use KeyPass, I may use it to store accounts which are not of high importance.